Using Natural Light for Bird Photography: Tips for Beginners
Using Natural Light for Bird Photography: Tips for Beginners
Bird photography is one of the most rewarding genres of nature photography. Capturing the vibrant colors, delicate details, and fleeting moments of birds in their natural environment requires patience, timing, and most importantly—an understanding of natural light. While modern cameras and editing software can do wonders, nothing compares to harnessing the beauty of natural sunlight to illuminate your subject.
For beginners, natural light can seem unpredictable and challenging. But with practice and the right techniques, you’ll discover that sunlight can be your most powerful tool in creating captivating bird photographs. In this guide, we’ll explore the fundamentals of using natural light, practical tips, and how to make the most of Colombia’s incredible birding destinations (or anywhere you’re photographing)
Why Natural Light is Essential in Bird Photography
Natural light brings authenticity, depth, and vibrancy to bird images. Unlike artificial lighting, which can often look harsh or unnatural in outdoor environments, sunlight provides:
- True-to-life colors: Many bird species have iridescent feathers (like hummingbirds or tanagers). Sunlight brings out those shimmering hues in ways artificial lights often cannot.
- Dynamic mood: From soft, dreamy sunrise light to dramatic golden-hour shadows, natural light creates mood and storytelling in your photos.
- Minimal disturbance: Artificial flashes can disturb or stress birds. Relying on natural light allows you to remain unobtrusive.
For beginners, learning how to see and use light is as important as mastering camera settings.
Understanding the Quality of Natural Light
Not all sunlight is equal. The quality of light changes throughout the day, and knowing when to shoot makes the difference between a flat, washed-out photo and a masterpiece.
1. The Golden Hours
- When? Shortly after sunrise and just before sunset.
- Why it’s ideal: The low-angle sunlight creates warm tones, long shadows, and gentle highlights. This softens harsh contrasts and makes bird feathers glow.
- Pro tip: Birds are often most active during these times, increasing your chances of capturing them in action.
2. Midday Light
- When? Late morning to early afternoon.
- Challenges: Overhead sun can create harsh shadows, blown-out highlights, and washed-out colors.
- How to manage it:
- Seek shaded areas like forest edges or canopies.
- Use backlighting creatively (e.g., rim lighting around feathers).
- Adjust exposure compensation to avoid losing detail in bright plumage.
3. Overcast Days
- Why they work: Clouds act as a natural diffuser, producing soft, even light with minimal shadows.
- Best for: Capturing fine feather detail and balanced exposures, especially for birds with white or dark plumage.
4. Dusk and Dawn’s Blue Hour
- When? Just before sunrise and just after sunset.
- Effect: Cool, blue-tinted light that creates atmospheric and moody shots.
- Note: Birds are less active, but silhouettes or roosting shots can be powerful.
Direction of Light: How It Shapes Your Photos
The direction of sunlight in relation to your subject can dramatically alter the outcome of your bird photos.
1. Front Lighting
- Description: The light source is behind the photographer, illuminating the bird fully.
- Advantages: Brings out colors vividly and reduces shadows.
- Use when: Photographing colorful birds like parrots, toucans, or tanagers.
2. Side Lighting
- Description: Sunlight hits the bird from the side.
- Advantages: Adds depth, texture, and contrast to feathers. Creates dramatic portraits.
- Best for: Birds with interesting feather patterns.
3. Backlighting
- Description: The sun is behind the bird, facing the photographer.
- Advantages: Creates glowing outlines (halo effects) around feathers, especially translucent ones.
- Challenges: Can underexpose the bird if not metered correctly.
- Pro tip: Slightly overexpose to capture feather detail, then adjust in post-processing.
4. Top Lighting
- Description: Midday sun directly overhead.
- Disadvantages: Harsh shadows, loss of detail.
- Solution: Use only when unavoidable, and look for natural reflectors like water or bright rocks.
Camera Settings to Maximize Natural Light
Learning how to adjust your camera settings to the available light is essential for bird photography.
1. Aperture
- Use a wide aperture (f/4–f/6.3) to blur the background and isolate the bird.
- In brighter conditions, you may need to narrow slightly (f/7.1–f/8) for sharper detail.
2. Shutter Speed
- Birds move quickly. A minimum of 1/1000s is recommended for perched birds.
- For birds in flight, use 1/2000s or faster.
3. ISO
- Keep ISO as low as possible for clean images.
- On cloudy days or in forests, you may need ISO 800–3200 depending on your camera.
4. Exposure Compensation
- In bright sunlight, especially with white or iridescent birds, dial in -0.3 to -1 EV to prevent blown highlights.
- In shadows, increase exposure slightly (+0.3 to +0.7 EV) to preserve detail.
Practical Tips for Beginners Using Natural Light
- Always check the light first before raising your camera. Ask yourself: Where is the sun? What mood does this light create?
- Move around the subject. Sometimes a few steps to the left or right dramatically changes the light’s effect.
- Watch the bird’s eye. If the eye has a catchlight (reflection of sunlight), your photo will look alive and engaging.
- Use your shadow. Stand with the sun at your back so your shadow points toward the bird—this ensures even lighting.
- Be patient. Birds move. Wait until they perch in a spot where light is best.
The Role of Environment in Natural Light Bird Photography
Colombia, with its varied ecosystems, provides diverse natural light conditions.
- Cloud forests (e.g., Sierra Nevada, Los Nevados): Often misty and overcast, perfect for soft light.
- Amazon rainforest: Dense canopy limits direct light—look for light shafts breaking through.
- Open savannas and wetlands (e.g., Llanos region): Ideal for golden-hour shots with dramatic skies.
- Coffee region hills: Slopes catch morning and evening light beautifully, illuminating birds against lush backdrops.
By adapting to these environments, you can harness the unique qualities of light in each habitat.
Common Mistakes Beginners Make with Natural Light
- Shooting only at midday: Leads to harsh, flat photos. Plan sessions around golden hours.
- Ignoring shadows: Watch for distracting branch shadows across the bird’s body.
- Overexposing bright plumage: Always check your histogram to avoid losing feather detail.
- Not adapting position: Staying in one spot instead of moving to improve light direction.
- Forgetting weather opportunities: Rain and fog can create moody, artistic images—don’t pack up too soon.
Case Studies: Natural Light in Action
Case 1: Hummingbird in Morning Light
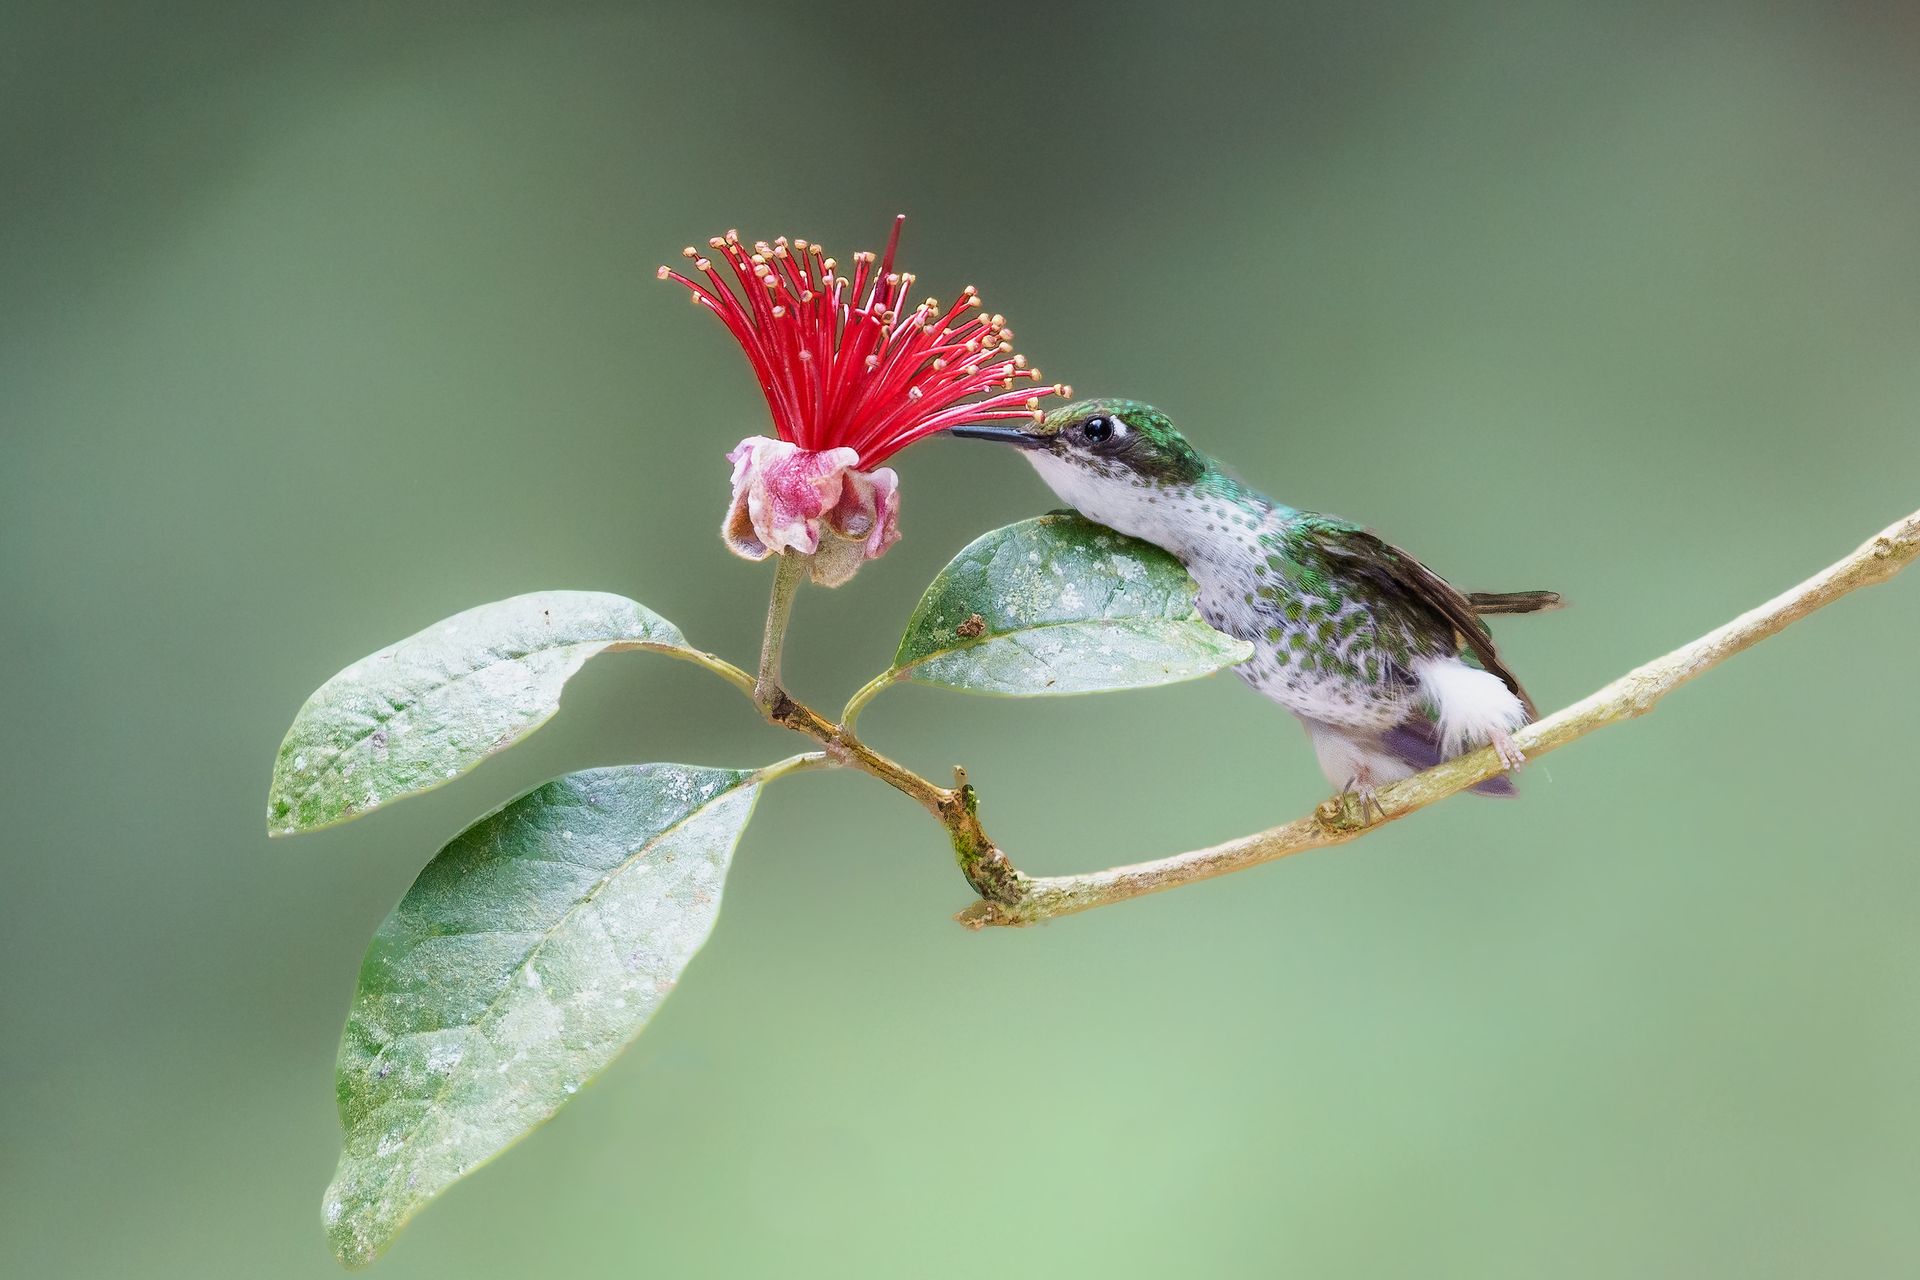
A hummingbird perched on a branch glows when sunlight strikes its iridescent throat at the right angle. By positioning yourself with the sun behind you, the bird’s gorget flashes vibrant emerald and ruby colors.
Case 2: Heron in Overcast Wetlands
An overcast day eliminates glare on water. This soft light reveals the subtle blue-gray tones of a heron’s plumage without harsh reflections.
Case 3: Toucan in Side Light
Side lighting in the coffee region highlights the toucan’s large beak, adding depth and texture while creating a storytelling image.
Building a Beginner’s Routine with Natural Light
- Morning (Golden Hour): Go for colorful birds and action shots.
- Late Morning: Switch to shaded areas or look for backlit compositions.
- Afternoon: Rest, scout locations, and plan for evening golden hour.
- Evening: Capture silhouettes, dramatic skies, and flock behavior.
This routine helps maximize shooting opportunities while aligning with the best light conditions.
Final Thoughts
Natural light is the soul of bird photography. For beginners, mastering how to see, interpret, and use light is more important than owning the most expensive gear. With practice, you’ll learn how different times of day, weather conditions, and environments influence your results.
Remember: patience, observation, and adaptability are your best allies. Colombia—or any birding paradise—offers endless opportunities if you’re willing to rise with the sun, wait for the right light, and let nature guide your photography.
So next time you’re in the field, don’t just look for birds. Look for the light—and watch how it transforms your photography.